Intuitive Cursor Control using Optical Processing Software
Cheaper, more accesible touchscreens...
Two-in-One
Our prototype combines two products into one:
 First
of all, it can be used in a conventional way using a 'pen.' In this
implementation, the pen is tracked using two cameras from two
different angles. When the tip of the pen touches the screen it
corresponds to a mouse click.
First
of all, it can be used in a conventional way using a 'pen.' In this
implementation, the pen is tracked using two cameras from two
different angles. When the tip of the pen touches the screen it
corresponds to a mouse click.
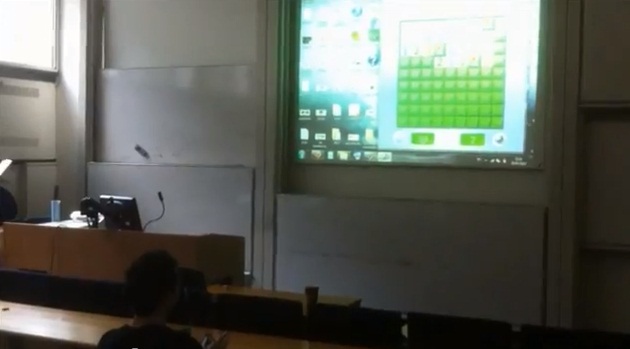
This system is very compatible in classrooms, as a better alternative to blackboards.
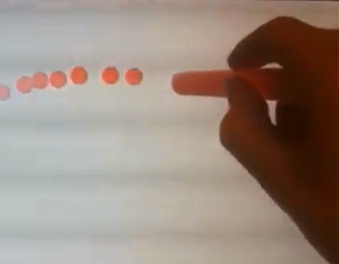
 The second implementation is using a laser pointer to move the
cursor on the screen. Left and right clicks can be implemented using
two separate buttons. The advantage of this method is that it allows
the user to be located as far away from the screen as they wish.
The second implementation is using a laser pointer to move the
cursor on the screen. Left and right clicks can be implemented using
two separate buttons. The advantage of this method is that it allows
the user to be located as far away from the screen as they wish.
This system is more compatible for use in presentations (especially for larger audiences).
Technical details:
The hardware consists of two webcam's, a black pen/ pointer, an electronic pen and two buttons communicating with the PC, and a laser preferably with a green beam. We assume that a projector and a board are already available.
The software
The program is written in MATLAB and uses the image acquisition toolbox to obtain frames from the imaging devices. Processing is mainly done pixel by pixel with if statements and loops that are handling the uint8 parameters that represent RGB values of the pixels currently processed. Movement of the cursor and click events are handled by external JAVA classes that are imported and executed from within the MATLAB program. Click events in the laser controlled cursor implementation are sensed by an external microcontroller sending click updates via UART.
Using a pen
The procedure to find the tip of the pen can be summed up in the flowchart below:
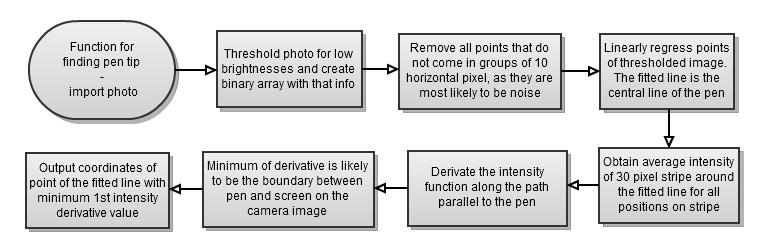 The algorithm for finding the pen tip is implemented in 7 intermediate steps: A specific brightness is then set as threshold and every pixel of the whole RGB image is tested with this. The result, after some noise clearing, gives a binary image including several (not all) points representing the pen. A straight line is then fitted through these points, which runs nearly parallel along the centre axis of the pen on the camera image. A function for colour intensity along this line is then created and filtered with a running average filter for noise reduction. As the pen is black the intensity function along the line through the pen drops fast when it enters the area of the pen, so the 1st derivative of the function has a negative peak there. Programmatically therefore, the pen-screen boundaries are taken to be at the point where the derivative of the intensity has its global minimum.
The same concept can be applied when using a pointer with a light-source and a sensor at the tip, and electronic pen. This has numerous advantages and disadvantages compared to the standard system:
|
System with
conventional pen |
System with
electronic pen |
Benefits of
better property |
|
Needs 2 cameras |
Needs 1 camera |
Less computing, cost
and setup |
|
High camera exposure
time |
Low camera exposure
time |
Faster system
response |
|
Cameras detecting
click |
Click by wireless
com. Channel |
More reliable
double-clicking |
|
Noise affected pen
detection |
Easily detectable
pen |
Higher precision |
|
Low cost pen |
Pen has electronic
components |
Low cost pen and
replacements |
|
No battery needed
for pen |
Battery is needed
for pen |
Battery
inconvenience avoided |
Using the laser pointer
Using the laser pointer doesn't require many adjustments from the previous set-up. The main differences are:
-
the position marker is the laser dot, not the pen tip
-
the dot always appears on the screen surface, so only one camera is needed
-
to locate the laser dot, the camera exposure time is reduced to such a small value that everything appears dark expect the high intensity light source (laser dot)
-
to find all the points the laser dot is sighted, search the recorded camera frames for pixels with high green brightness, i.e. >150
-
the position the user is pointing to is taken to be the centre of mass of these points
There are several benefits in doing this
including bigger range, ability to point to something more
accurately, and opportunity to use only one camera instead of two if
just the laser cursor control is needed.
For the pen, clicking is executed when the pen touches the screen. This is computeted by analysing the depth (due to the two cameras looking at the pen from different angles.) For the electronic pen, clicking occurs when the sensor at the tip of the pen detects the screen surface.
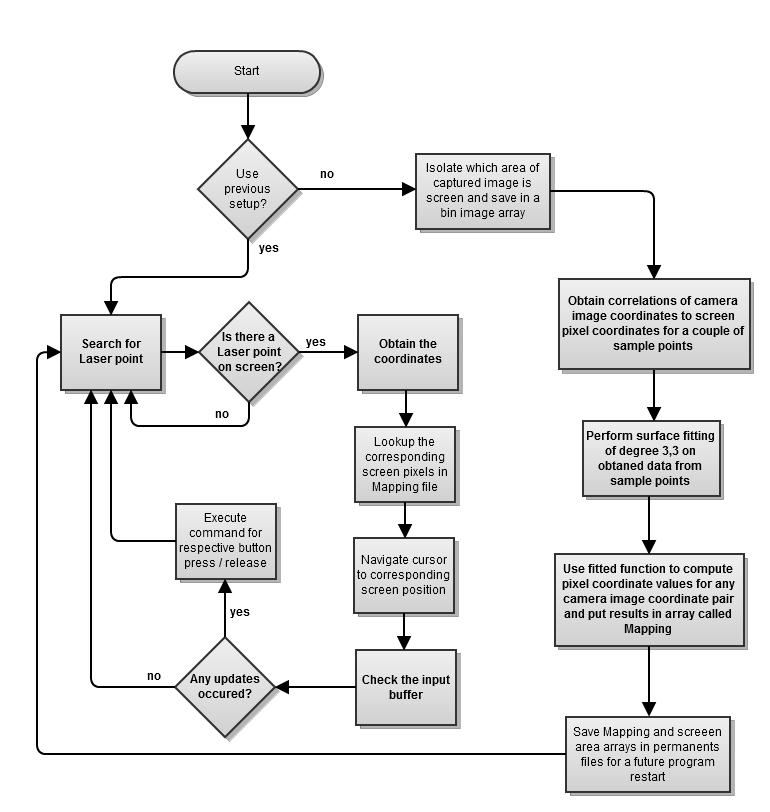
The process for clicking for the laser pointer implementation can be seen in the flowchart below (which illustrates the whole process for this implementation:
All three implementations were tested and proved succesfull. The demonstrations can be found on the gallery page.
The Team

ICCOPS consists of a three- member team:
Ioannis Mariggis (right)- Second Year EEE student at Imperial College, team leader
Pascal Ruetten (middle)- Second Year EEE student at Imperial College
Afanasie Tamciuc (left)- Second Year EEE student at Imperial College
If you need to contact us please use the information on the "About" page.